
What is all this Clean Architecture jibber-jabber about? - Part 3
First of all I would like to apologize for the delay in releasing the third and final article of the series. I’ve been a bit busy lately, sorry… In the meantime, Clean-Architecture related posts have been appearing (e.g. Hexawhat Architecture?), my friends from Karumi have released two versions of Rosie (their awesome Android framework to create applications following the principles of Clean Architecture), Otto, a library that I use in the sample, was deprecated (no worries, it won’t be a problem) and even Google has even created Android Architecture Blueprints, a collection of samples to discuss and showcase different architectural tools and patterns for Android apps. Nonetheless, I’m pretty sure you’ll learn something, so keep reading ;)
In the previous post, we dived into the architecture part in detail. We analyzed the big picture of some layered architectures, explaining their pros and cons and then we described the main concepts of Hexagonal architecture.
In this post, we are ready to get our hands dirty. I’m going to show you Catan Architecture, a hexagonal architecture sample for Android.
I’ll explain how I structure the application into different modules and how to communicate them using an event bus. Yes, I said bus and, trust me, it’s not that bad if you use it properly.
We’ll explore every module describing the testing approach followed.
Besides, we’ll see how to package each module following the vertical slicing technique and reviewing all layers involved in detail.
But remember, it’s all about decoupling your business logic from the outside world (meaning frameworks, implementation details, etc.) and ending up with the maintainable, testable and with low technical debt application that people love. Let’s play folks!

Sample app: CleanClone
We are going to work on CleanClone. CleanClone is an app that allows you to easily remove repeated media elements from your different storages (SD card, Dropbox, etc.). In order to show you the whole development process, we are going to focus on the first requirement that comes to my mind: List folders’s use case.
Ports and Adapters architecture
As I mentioned in the previous post, Hexagonal architecture is also known as Ports and Adapters architecture. The main objective of this architecture is to separate concerns and have the business logic isolated, through the implementation of Ports and Adapters. So, we are going to divide the application into three different modules: hexagon, adapters and app. Let’s describe each one step by step.
Hexagon module
This is the most important part of our application, where the core logic and the business rules live. It’s what makes our app different from others.
Because it’s completely Android-free, we defined it as a Java only module but you could use another language like Scala or Kotlin if you want.
So, how do we structure the hexagon module?
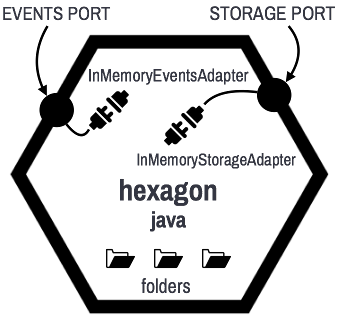
First of all, we have to create a different package for every side (port) of our hexagon.
How many ports do we need right now?
In order to accomplish our first requirement (List folders) we are going to need at least two ports: an EventsPort so we can communicate the different modules between each other (as I said earlier we are going to use a Bus-based approach) and a StoragePort in order to offer the storage-functionality required.
In the events package we define the Events contract (a.k.a. EventsPort), its in-memory Adapter implementation and the Event interface (necessary to create different events-messages).
As you may already know, a Bus defines two main methods, on and broadcast, because objects communicate by sending events to the bus which other bus members receive.
We are only going to use the Bus to communicate the hexagon with the external world, both inwards and outwards. Nowhere else!
On the other hand, in the storage package we have the StoragePort interface with loadFolders() behavior and, again, its in-memory Adapter implementation.
As you may have noticed, we have the in-memory implementations inside the hexagon. But, why? Why is it advantageous to do that? It’s simple, we are able to wake up and interact with the hexagon without anything else. So we can test it and see how it works in isolation. We are able to implement the whole business logic without worrying about other modules.
Finally, we have a modules package in which we define two sub-packages: vertical and horizontal. The vertical sub-package is where our different features live, and in the horizontal one we have all the artifacts shared and used by the different vertical requirements. In our example, in the vertical package we define a folders slice and we create all we need in order to implement the user story required.
The idea is to create a class (FoldersModule) in which, using a bus, we register the different events (commands, responses, etc.) and implement a flow to accomplish the use case.

How does it work?
List folders:
-
Register
LoadFoldersCommandevent. (In order to wake up the hexagon a LoadFoldersCommand event has to be sent). -
When
onLoadFoldersCommand is called, executeloadFolders()through theStoragePort. (WhenloadFolders()finishes, it sends a LoadFoldersResponse event). -
Register
LoadFoldersResponseevent. -
When
onLoadFoldersResponse is called,broadcastLoadFoldersFinishedevent with the folders obtained.
Testing approach
The hexagon module has no dependencies on the Android framework, so we take advantage of it and we write plain JUnit tests that run locally on the Java Virtual Machine (JVM). This means that those tests will run fast, because we avoid the overhead of loading the target app and unit test code onto a physical device or emulator.
Which is the best test-strategy to follow here?
-
Test that when we ask for folders, we are receiving them properly from the storage.
-
Because we are using a bus approach, we have to test that the correct event messages (previously described in the flow) are sent.
With those tests we have checked the List folders’s functionality and we are good to go to the next module.
Adapters module
If you remember from the previous post, an adapter is a bridge between the application and the service that is needed by the application. Basically, it’s an implementation of a specific port.
The main idea of Ports and Adapters architecture is that the application can be used by different users. Alistair Cockburn explains its intent really well in the following quote:
“Allow an application to equally be driven by users, programs, automated test or batch scripts, and to be developed and tested in isolation from its eventual run-time devices and databases.”
In order to reach that, each user can create its variant by plugging in different adapters. So, those custom adapters are going to live in this module.
Again, we don’t have any Android dependency here, so we define it as a Java only module.
Remember that all our contracts are defined in the hexagon module, so we have to include it as a dependency in the adapters build.gradle file.
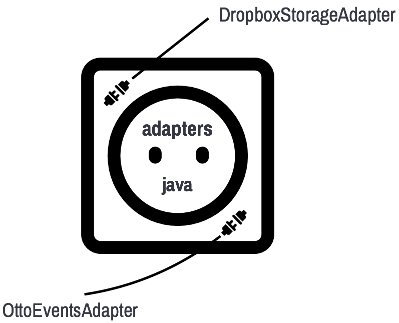
In this case the structure is even easier. We only have to ask ourselves “How many ports do we have?”, that will tell us the number of packages we need.
In our case, events and storage packages.
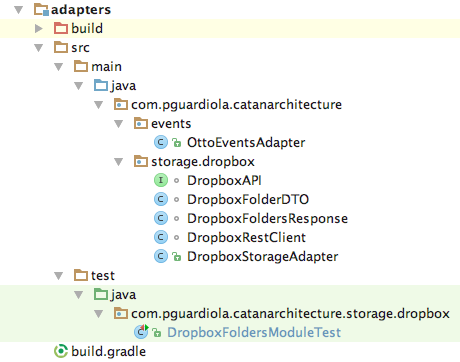
In the events package we define OttoEventsAdapter which implements the EventsPort interface.
On the other hand, in the storage package we are going to create a sub-package called dropbox in which we’ll have everything necessary to get the folders from Dropbox.
Again, we have to create an adapter (DropboxStorageAdapter) that obeys the StoragePort contract. Besides, we are going to use Retrofit in order to get the necessary info from the Dropbox API.
Keep in mind that we are building an app that removes repeated media from different storage sources. So it’s a good idea to put each group of related artifacts in different properly named packages.
Testing approach
As you can imagine, we have to test that our Dropbox API client implementation is responding as expected and we are retrieving the correct folders when asking Dropbox.
In order to test the integration with our server side API, we are going to use a third party tool called MockWebServer (a scriptable web server for testing HTTP clients).
Although these tests are Integration tests, with this approach, we are testing that we are sending the proper messages to the API and parsing the responses correctly without doing real HTTP requests, which means that we are writing Sociable unit tests and we are still getting all the benefits of common Unit tests.
App module

Finally, we have to implement the UI part. Ultimately, our main objective was to build CleanClone, an Android app to easily remove repeated media from our cellphones.
Here is where all Android related components live, so, obviously, it’s an Android module.
In order to have access to everything previously developed, we have to include both hexagon and adapters modules as dependencies in the app’s build.gradle file.
We are going to structure the module in a similar way to the previous ones.
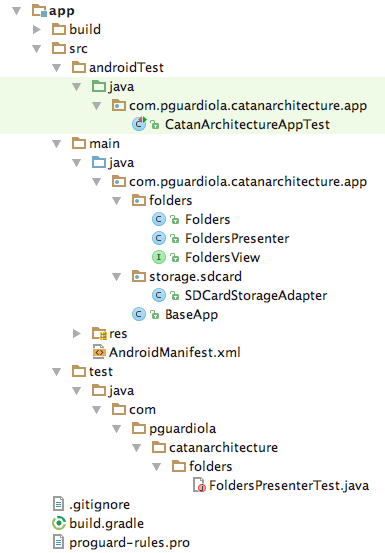
First of all, we create a new slice called folders, in which we are going to implement the Folders presentation layer using the Model View Presenter pattern.
In order to obtain the folders from the SD card, we have to create a new adapter (SDCardStorageAdapter) under the sub-package sdcard.
The reason why we don’t define this adapter in the adapters module is simple. It’s Android-related, and we are going to have all Android dependencies in the app module. As mentioned earlier, the others are Java only modules.
Lastly, and for the sake of the sample’s simplicity, we are going to create a base application class (BaseApp) to create the different adapters and provide the dependencies needed.
We should consider implementing an alternative solution, like the use of a DI framework (Dagger or similar) or a Service locator.
Testing approach
For testing Android apps, you typically create:
-
Instrumented tests: These tests have access to instrumentation information, such as the Context for the app under test. These tests are under the
androidTestfolder and run on an Android device or emulator. -
Local tests: The Android Gradle plug-in supports running Android unit tests on the JVM. These tests are under the
testfolder and you can use the JUnit test framework.
For the first group, we are going to test the contract of the views. In other words, we are going to check that our screens have defined the proper UI (e.g. in a login form, there are two input fields and a login button). We should take the UI definition as a specification/requirement, normally given by our UX teammates.
In this particular case we are going to check if there is a view (that holds the folders obtained) with the correct id.
For the second group, we are going to unit test the presenter. That is, we are going to verify that all methods are called properly (hexagon interaction correctness) and we are going to check if the list of folders obtained is set into the view.
Conclusion
We’ve developed an app from scratch following the Hexagonal architecture, principles and techniques described in the previous posts and we’ve very successfully achieved our objective:
Implement a maintainable, testable and tested application with low technical debt.
And most importantly, now we are able to face new requirements and we are prepared to apply all we’ve learned along the way.
P.S I hope you enjoyed the series. It was a pleasure to share with you my thoughts and I hope you’ve learned as much as I did. But this doesn’t have to end here, I’m really looking forward to hearing from you so we don’t stop learning. Please, feel free to leave a comment below, send a Pull Request or open an issue on Github!
FREE bonus!
As you may have noticed, I’ve developed a hexagonal grid in order to implement the list of folders. So, I decided to package it in a small library called HexGrid and open sourced it as well! Please, I encourage you to check it and help me to improve it. Again, I’m waiting for your thoughts, reviews and PRs!